In todays post we want to show you how we set up the shiny server behind our aikia apps and coincidentially the whole aikia setup we currently use.
If you have a little bit of experience with shiny, you might know that there are several nice ways to set up an own shiny server:
- Using your own local linux-based server
- Using a cloud computing service like AWS or Azure
- Using a host service like shinyapps.io or netlify
- Using Windows built in WSL2 Linux Virtual Machine
Everything has its own pros and cons. Cloud services like AWS are for example really easy scalable if your app gets bigger and bigger, but in the beginning choosing a performant instance is kind of expensive. Hosting services also don’t come with plentiful RAM and CPU for free. A local server needs infrastructure and an initial investment.
As we have tried out possibilities above, we decided to use a computer with an Intel i7 CPU and 16GB of RAM as our server.
In comparison, the same specs on AWS currently cost about 15ct per hour, so roughly 110$ a month. Maybe we won’t need this much of resources from the beginning, but it’s nice to have and comes for nothing more than our utility prices.
1 Setting up the Server
1.1 Installing Linux
The first step we undertook was installing a linux distribution (in our case ubuntu 20.04 LTS) to the computer. The guide provided by ubuntu for creating a bootable device and installing from it is straight forward, so we won’t deep dive into it here. Just check it out yourself.. As we ran into some installation problems from our side - the installation wouldn’t let us format the hard drive - we first had to wipe out the complete hard drive. We suggest that for you too if you had a windows installation on the hard drive, too. The classic DBAN (Darik’s Boot and Nuke) should help you with this step.
After the installation, you should see your fresh ubuntu screen with a cat staring at you like this:
For working on the server we chose access over TeamViewer (we’re in no ways linux pros so we wanted to have a GUI), so first thing we did was installing it. Using a SSH connection would be the more linux-y way so if you’re familiar with linux this might be the way to go for you.
1.2 Shiny Server: Local, containerized, with http or https?
After finishing the linux setup, we had to make an important decision. How do we want to deploy our stuff and what is the most maintenance-friendly setup.
We came to the conclusion that we need the following parts:
- A shiny server hosting our apps
- A web server hosting our website
- Some kind of SSL encryption so everything will be secure
The first few tries were all failures, to be honest. We tried installing shiny-server and some web server locally (we used nginx and caddy), but nothing worked out of the box. And because everything was installed locally and we’re nowhere near linux pros, our server quickly became nearly unusable as we trial-and-error-installed too much stuff.
1.3 The solution
We found our unicorn with Docker and docker-compose. Docker is a product for containerized applications and software, where individual applications live in a container that is a standalone environment, with it’s own OS and so on. All this information about your application is defined in a Dockerfile, you’ll see ours later. If you want to learn more about Docker and containers, please visit there website.
Docker-compose then is a framework for combining multiple standalone containers into one larger multi-container Docker application. It relies on a YAML
file containing the configuration of the multi-container app.
The huge advantage of docker is, that we can try out as many things as we want without clocking up stuff on our own machine. If some container is broken, we just rebuild it.
To get along, install Docker and docker-compose as stated on their website
1.4 Creating a Docker image of our app
To run a container within docker, we need an image of something we want to work with. An image is a preset of informations, like which OS to use, where to have our files in the filesystem and which files to copy. The information for the image lies in the Dockerfile looking like this:
FROM rocker/r-ubuntu:20.04 #Main Image

LABEL maintainer="aikia <aikia.update@gmail.com>"

# Run install commands like you would do in linux directly
RUN apt-get update && apt-get install -y --no-install-recommends \
    sudo \
    pandoc \
    pandoc-citeproc \
    libcurl4-gnutls-dev \
    libcairo2-dev \
    libxt-dev \
    libssl-dev \
    libssh2-1-dev \
    libmariadb-dev \
    libquantlib0-dev \
    && rm -rf /var/lib/apt/lists/*

# libmysqlclient seems to need an update before installing.
RUN apt-get update && apt-get install -y libmysqlclient-dev

# Copy your filesystem - This will fail if files don't exist in the build directory
COPY Rprofile.site /etc/R
COPY ld.so.conf /etc
COPY my.cnf /etc
ENV _R_SHLIB_STRIP_=true

RUN sudo ldconfig

#Install R Packages
RUN install.r shiny tidyverse forecast jsonlite htmltools DBI \
    RMariaDB devtools remotes plotly fs RQuantLib \
    scales gt shinydashboard bizdays here patchwork ggtext heatmaply \
    metathis shinydashboardPlus

# Install R Packages from github
RUN Rscript -e "remotes::install_github(c('daattali/shinycssloaders', 'gadenbuie/shinyThings'))"

#Set Shiny Port
RUN echo "local(options(shiny.port = 3838, shiny.host = '0.0.0.0'))" > /usr/lib/R/etc/Rprofile.site

RUN addgroup --system app && adduser --system --ingroup app app
WORKDIR /home/app
COPY app .

RUN chown app:app -R /home/app
USER app

# Open Port 3838 of the container
EXPOSE 3838

CMD ["R", "-e", "shiny::runApp('/home/app')"]
We first use an image that comes with an ubuntu OS and R preinstalled. This images are made by the awesome rocker project. Check out their other images, they have pre-built images for many different purposes.
The next step is very similar to how you would set up a local linux installation of shiny server. We run apt-get update && apt-get install for some of the linux packages we need. For example, libmariadb-dev is needed for connecting to our database.
After installing basic software, we now need to move some files around in the filesystem. This is mainly done so that the containe&rs OS can find config files. Here for instance the my.cnf contains the configuration for our MySQL database and the MariaDB client expects this configuration in the folder /etc.
The install.r function is an easy wrapper for installing R packages, you can see in the next block that you also could do installations via Rscript -e install.packages(), but install.r lets us just list all CRAN packages we need.
One very important part then is to expose port 3838, so that you can actually reach the app.
As soon as you’re done with the dockerfile, it’s time to build the image. This means to run the dockerfile once, so it gets saved on your machine and you can access it via its name.
sudo docker build . -t dashboard:latestThe command here is to build the docker image located in the directory where you are (so don’t forget to cd to the directory where you have your dockerfile). With the -t operator, you set the name to dashboard and the tag to latest. The tag helps if you have multiple versions of your image, such as stable and test versions for example.
The first run might take a while, but docker caches most stuff, so the coming rebuilds don’t take too much time (note that if you add just one new R package to the dockerfile building will reinstall all packages). If your build was successful, it should look like this:
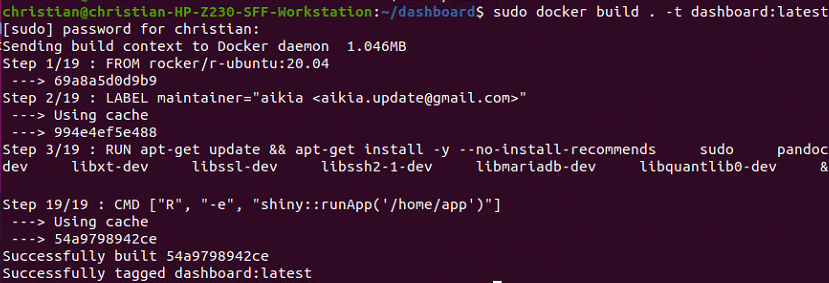
docker build command
If you had success, we can now try to run the container and take a look at our app.
sudo docker run --name test1 -p 3838:3838 dashboard:latestThe docker run container starts our image dashboard:latest that we just built. we name it test1 with the --name argument to distinguish it from other containers and finally map the container’s port 3838 to our localhost’s port 3838 with -p 3838:3838. If you don’t add -d, the container will start from the terminal window where you typed the command, which makes it a bit easier to debug your app. In production, you want to run it detached, so dont forget to add the -d.
Here is an example of how our container looks after running.
docker run command
Without any errors, we can now navigate to our localhost port 3838 and take a look at our app. Looks familiar, doesn’t it?
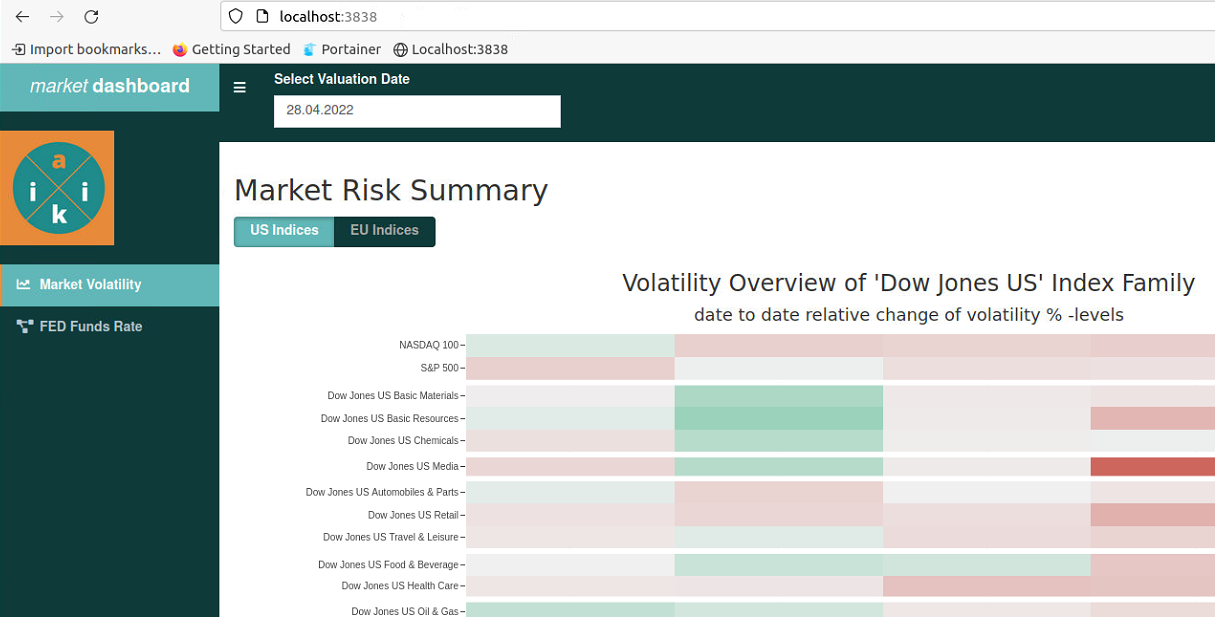
app on localhost
1.4.1 Summary
So to catch up this paragraph, this overview should help you to get your shiny container running:
- Install Docker
- Create a directory with your shiny app and a dockerfile in it
- Set up your dockerfile with all needed linux libraries and R packages
- Open a terminal and
cdto your apps directory - Build your image with
sudo docker build . -t your_image_name:latest - If build successfully, run your image with
sudo docker run --name yourname -p 3838:3838 your_image_name:latest - Go to localhost:3838 and find your app there
1.4.2 Protip
The easiest way to handle your image and app is to have a github directory, with a local copy on your server and your PC. We try to not change anything when we are connected to the server. Every change is made locally and commited to the repo. If everything works as expected, just navigate to your repo, run git pull and do steps 5-7. More about our setup will follow later on.
1.5 Expose our app to the web with docker-compose and Caddy
Now that we have our running app container, we need to think about how to get it to the world wide web. A fairly easy but also maybe not so secure way would be to map our port 3838 to port 80 of our router. This would mean that everyone knowing our IP could just navigate to it and find our app.
As we want to use 1st a secure connection via https and 2nd our own domain, we have to set up a webserver that gets us a SSL-certificate for a secure connection to our domain and link our IP to our custom domain. The second is fairly easy if you have (like we do) a static IP from your internet provider. You then just set an A or AAAA record in the domain’s DNS settings to route traffic on your domain to your IP. If you have a dynamic IP like many have, it’s still not difficult, but you will need a DynDNS service to automatically update your IP. We can recommend ddclient for this, so check out their docs.
Getting a secured web server is a little more difficult, but thanks to docker we already have many prebuild servers which you just have to configure yourself.
1.5.1 Installing Caddy as web server
For our website, we use Caddy. It is open source and comes with automatic HTTPS. Additionally, the configuration is very straightforward even if you don’t have any experience with webservers.
The configuration for a Caddy server lives in a Caddyfile. You can learn more about the files on Caddy’s website, but simplified we just tell the server to reverse proxy our dashboard app on our localhost port 3838 to the aikia.org/dasboard/ page. The {$HOST} and {$EMAIL}-parameters are set in a docker-compose file. We also could set it directly to aikia.org, but maybe we want to add different domains at a later stage and this setup will help us keeping overview.
{
    email {$EMAIL}
}

{$HOST} {
    root * /srv
    handle_path /dashboard/* {
        reverse_proxy dashboard:3838
    }
    file_server
    handle_errors {
        @404 {
            expression {http.error.status_code} == 404
        }
        rewrite @404 /404.html
        file_server
    }
    log {
        output file /var/log/caddy/access.log
    }
}
Now we have configured our Caddy server but actually never ran it before. Here we’ll see some of the docker-compose magic. With docker-compose, it’s possible to run multiple containers from one single compose file.
The docker-compose.yml file is the heart of our setup. Here we set a framework how to run our different containers.
version: "3.7"

services:
  dashboard:
    image: dashboard:latest
    restart: always
    expose:
      - "3838"
  caddy:
    image: caddy:2.3.0-alpine
    restart: always
    ports:
      - "80:80"
      - "443:443"
    volumes:
      - $PWD/Caddyfile:/etc/caddy/Caddyfile
      - $PWD/site:/srv
      - $PWD/log:/var/log/caddy
      - caddy_data:/data
      - caddy_config:/config
    depends_on:
      - dashboard
    environment:
      - HOST="aikia.org"
      - EMAIL="aikia.update@gmail.com"
volumes:
  caddy_data:
  caddy_config:
The services section contains the single containers. As you can see, the first service is our dashboard app, where we use the dashboard:latest image we created before.
Our Caddy server uses the base image provided by Caddy itself. We open the ports 80 and 443 for the server. Note that port 80 is just used once to obtain the SSL certificate. The volumes part is standard and we didn’t change anything from the suggested configuration. The depends_on argument tells docker-compose to first start dashboard and then caddy. Finally, the environment arguments set the variables HOST and EMAIL that are used by our Caddyfile.
If we have set up our docker-compose correctly, there is just one command needed to fire up our app secured by HTTPS.
docker compose up
That’s it. That’s all of a command you will need (If you’re not running as root you’ll need sudo -E bash -c "docker-compose up -d").
Caddy now will try to obtain a TLS certificate via Let’s Encrypt and if successful, serve your site defined in the Caddyfile with HTTPS.
Not running in detached mode, the output looks like this:
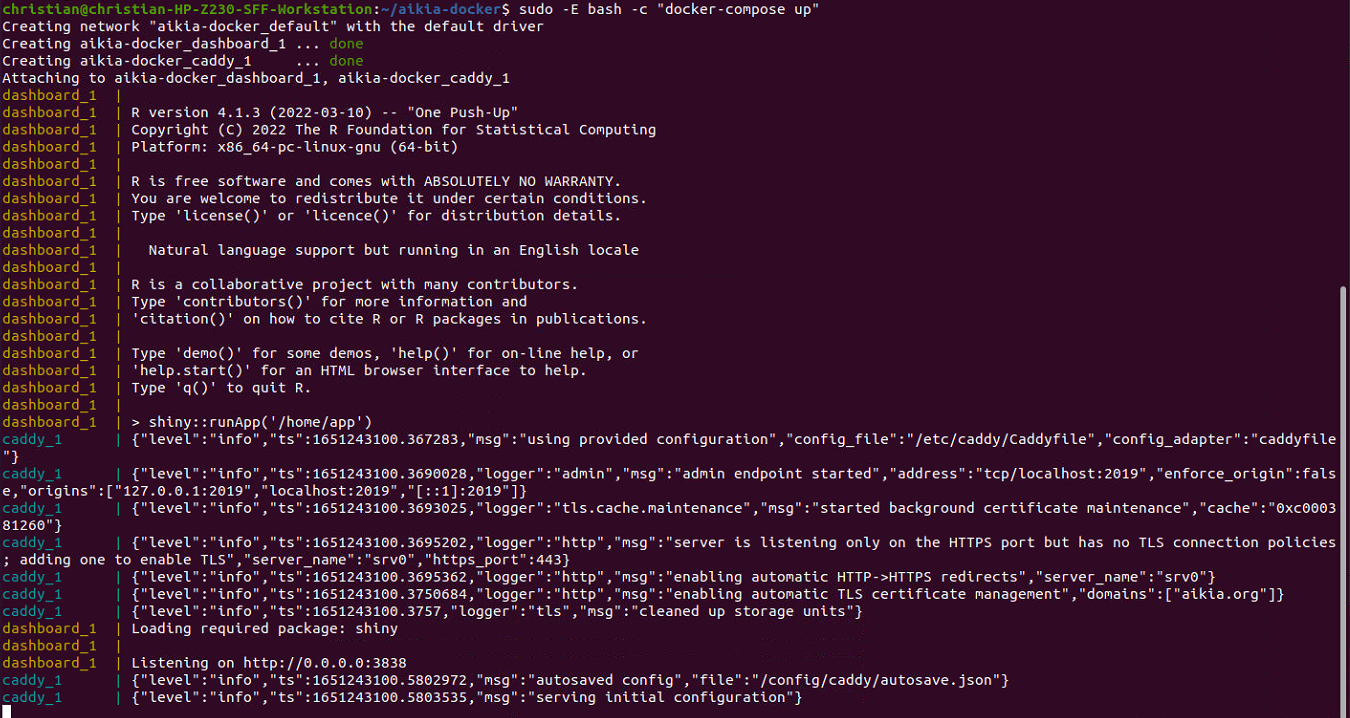
docker-compose up output
Looking at your domain Caddy should greet you like this:
And let’s check our apps status, too:

aikia.org with https
Wow, it’s secure to browse our site now, awesome!
You can now put anything you want into your working directories site folder to be served as a landing page on your domain to get rid of Caddy’s welcome page.
And finally that’s where we’ll leave it for today.
1.6 Summary
So here is our final cooking recipe for a local server hosting a shiny app via HTTPS:
- Install a Linux distribution of your choice
- Install docker and docker-compose
- Buy an own domain and link it to your machine
- Create a GitHub Repo with your app and clone it to your machine
- Initialize a Dockerfile and build the image of your app with
sudo docker build . -t your_image_name:latest - Create a directory to launch your docker-compose from
- Create a docker-compose.yml file containing the image of your app and a Caddy image
- Configure the Caddyfile to your needs
- Copy your own landing page into the
sitedirectory - Fire up the containers with
docker-compose up - Take a sigh of relief and look at your beautiful HTTPS secured shiny apps on your own domain
We hope you enjoyed the article and, most importantly, that it helped you get ahead. As always, we appreciate your feedback and are very happy to get in touch reply@aikia.org.